In the distance is a small volcano in the middle of the lake
When
I saw this guy I did a double take. Floating corpse on the lake? I asked
one of the locals what this dude was doing. Apparently he's fishing
using arrows (if I heard right). Crossbow perhaps? Or could he be using a
spear of some sort?
Close up of the volcano. Very heavily processed image. And that's because the sky was too bright and there was this haze that just turned the whole image very flat.
Uhh, headhuntress?
Growing old together. Saw these trees outside a small church. My 18-55mm lens just wasn't wide enough to get everything in the frame.
Fantasy World
Copyright Notice
Tuesday, November 20, 2012
Wednesday, November 14, 2012
Insect and flower macros
All images shot with a Canon Powershot A480 set to SCN Super Macro mode with the lens at maximum wide angle (6.6mm).
I had enabled CHDK so that I could have RAW files to tweak in software. Darn thing is, after the shoot, I found out the cam shot only in JPEG! So that's why the camera was uploading the files to the SD card much quicker than usual. Well, not a big loss. I can shoot ants and flowers everyday if need be. Fortunately the JPEGs were not too bad, given that there was enough ambient light--I was shooting at the middle of the day with partly overcast skies.
The macro capabilities of a point and shoot is actually better than using standard lenses on an SLR. The only drawback--with the A480 at least--is the lack of a control over focus. So I ended "spraying and praying," shooting as many shots as possible and hoping that at least some of them had the subject in (relatively) sharp focus. Well, it worked, didn't it?
 |
| 1/80", F/3, ISO, 400 6.6mm |
 |
| 1/100", f/3, ISO 400, 6.6mm |
 |
| 1/250", +2/3EV, f/3, ISO 400, 6.6mm |
 |
| 1/320", f/3, ISO 400, 6.6mm |
 |
| 1/80", f/3, ISO 200, 6.6mm |
Monday, November 12, 2012
It's a bird! It's a plane! It's a flying saucer! It's ...
First time to spot the International Space Station and shoot it. It's fainter to the naked eye than I expected. Not least because it was only 34 degrees (at its maximum) above the eastern horizon to begin with. Venus was rising and the station was much dimmer. I almost didn't recognize the blip as the station. As a matter of fact it was already close to the northeast (where it would "set") when I spotted it. According to NASA it would be visible for just two minutes. True enough, as NASA claims, it zips across the sky at the rate of an airplane.
I initially wasn't planning on shooting, just checking whether I could see the station and if I did then I'd note its brightness and speed, using the observations in planning a future shoot. But at the last minute I said to myself, What the heck. I'll get my gear out and try anyway. Little beginner's luck here. Though I was able to--a miracle in itself--capture the station, the images were crappy.
While waiting for the appointed time, I preset the camera to ISO 3200, 1/50", f/10. Shot the very first frame with this setting. But I subsequently decremented the shutter speed until it was just 1/10". I kept the aperture fixed because any larger and lens sharpness deteriorates. In what was going to turn out to be the very last shot--because I couldn't see the station after that--I bumped up the ISO to the maximum of 6400 (I wasn't even going to use "H"--ISO 12800--because of its very high noise) since judging by how quickly the station was moving across the frame in the viewfinder and because I was so damn concerned about camera shake, 1/10" was the slowest I was willing to go.
Was able to shoot a mere seven frames. I learned pretty quickly that tracking a faint object racing across the night sky with a long lens while trying to keep camera shake to a minimum even as it's mounted on a tripod most certainly isn't a walk in the park.
In the image below the station appears simply as a bright blob.
 |
| Canon T3i, 1/20", f/10, ISO 3200, EF 75-300mm III @300mm, 10-second self-timer enabled |
Because of the time constraint I was in panic mode and was fumbling over the camera's controls. I had preset the camera with both mirror lockup and the 10-second timer enabled to dampen camera shake from pressing the shutter button. Not an excellent choice. I discovered that ten seconds is about the amount of time the station takes to traverse the frame of a 300mm lens (APS-C sensor). So I found myself actually re-aiming the camera after I had pressed the shutter the second time (the first press just locks the mirror up). The mirror was already out of the way so I was doing this without feedback of whether I'd be able to catch the subject in the frame (I didn't even bother using Live View).
I disabled the timer towards the latter of the shoot. Unfortunately, there aren't any dots in the images which I'm confident of as being stars. That would give me a barometer as to how much camera shake there was. After much poring over the images I've concluded that all of the white specks in the images are digital noise, and what I thought were solar panels of the station are more likely to be streaking caused by camera shake after I disabled the self-timer. Dang!
 |
| 1/10", f/10, ISO 3200, 300mm, self-timer off |
In lieu of the self-timer I may have to use a remote shutter control.
Sunday, November 4, 2012
Macro shot(s) with focus stacking
Took some 17 RAW images with the Canon T3i on a tripod, in manual mode, manual focus, with image stabilization off. Just ever so slightly turned the focus ring after every shot. Then took 14 of those (didn't use the first and last two) straight from the camera without any manipulation whatsoever and followed McCordall's method of focus stacking. I then flattened the image, removed various blemishes and tiny dirt particles on the flower using the spot healing brush and clone tool, sharpened using the high pass filter method, and finally boosted the contrast a bit by creating a duplicate layer with soft light blend mode at 50% opacity.
Ambient light was used but because the flower kept vibrating in the breeze I had to move the potted plant indoors by a huge window. Exposure was of course the same for each frame, but because the sun was partly slipping in and out the clouds, some shots were a fraction of a stop brighter/darker than others. The final composite image still seems to have come out ok.
The Zeikos lens is nowhere close to good. In fact I'd immediately give it away if ever I get hold of an extension tube or real macro lens. High pass filter sharpening helped a heap in obtaining a better image quality.
A couple of "normal" images of the flower and the plant using a not so normal focal length.
Ambient light was used but because the flower kept vibrating in the breeze I had to move the potted plant indoors by a huge window. Exposure was of course the same for each frame, but because the sun was partly slipping in and out the clouds, some shots were a fraction of a stop brighter/darker than others. The final composite image still seems to have come out ok.
The Zeikos lens is nowhere close to good. In fact I'd immediately give it away if ever I get hold of an extension tube or real macro lens. High pass filter sharpening helped a heap in obtaining a better image quality.
 |
| Canon T3i, 1/5", f/11, ISO 100, 18-55mm II @55mm + Zeikos macro attachment |
A couple of "normal" images of the flower and the plant using a not so normal focal length.
 |
| 0.3", f/16, ISO 100, 75-300mm III @300mm |
 |
| 1/4", f/16, ISO 100, 75-300mm III @300mm |
Saturday, November 3, 2012
Run like the wind
 |
| Canon EOS T3i, 1/25", f/5.6, ISO 800, 18-55mm II @55mm |
This was a lucky shot. I was in AF-Servo focusing and single shot mode (not continuous in which I should've been). I panned the camera at the speed his was moving. Because the boy wasn't running too fast I was able to keep up with him. His face isn't tack sharp but focus is fairly good.
The original image didn't have that much motion blur in the background. As you can see the background is very cluttered and that nearly drowns the subject. So blurring the background was imperative. And to boot increasing the motion blur would accentuate the boy's apparent speed.
So in one layer I masked out the boy with the ball, cloned in the adjacent pixels to fill the empty space, and then applied the motion blur filter. I had another layer with everything masked out except the boy--the very inverse of the previous layer's mask. I applied a 10 pixel feathering to the mask so that there wouldn't be a sharp jagged transition between him and the background. I then duplicated that layer of the boy, applied a high pass filter to it, desaturated the result and then changed the blend mode to overlay. This technique is used to increase the sharpness of the image.
Friday, November 2, 2012
Morning, bud!
 |
| Canon EOS T3i, 1/100", f/5.6, ISO 400, 18-55mm II @55mm |
Background was cluttered by various foliage very close by so it was imperative to blow it out of focus. At f/5.6 lens sharpness isn't at all optimal. Bokeh is not fantastic but not grotesque either. In post I brightened the subject and dimmed the background to further make the background recede in importance.
By the way, did I mention I took this late afternoon and not in the morning?
Thursday, November 1, 2012
Applying tonal contrast to moon images
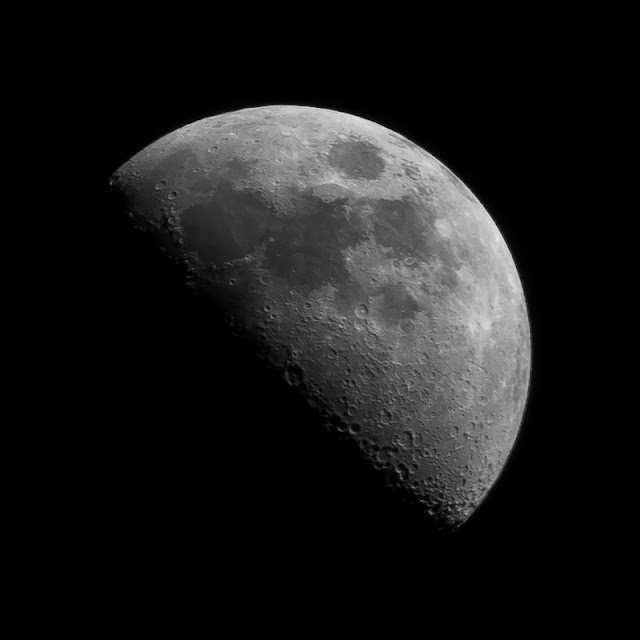
Learned a new technique which--it seems to me--is akin to the clarity slider in Lightroom and Photoshop. Scott Kelby demonstrates it in a video (@54:00 min) and he calls it adjusting the tonal contrast of an image. As you can see in the comparison below the details jump right out in the image that's had tonal contrast adjustment. It looks sharper as well.
Here's how I processed the raw image (it's one of those from the October 22 shoot).
In the Oct 22 shoot I had taken the images with the camera facing south and tilted upward--because that's how I was looking at the moon. Here I've rotated the pictures 90 degrees so this is how the moon would look if you were looking east and tilting your head waaaay back (and getting severe neck pain).
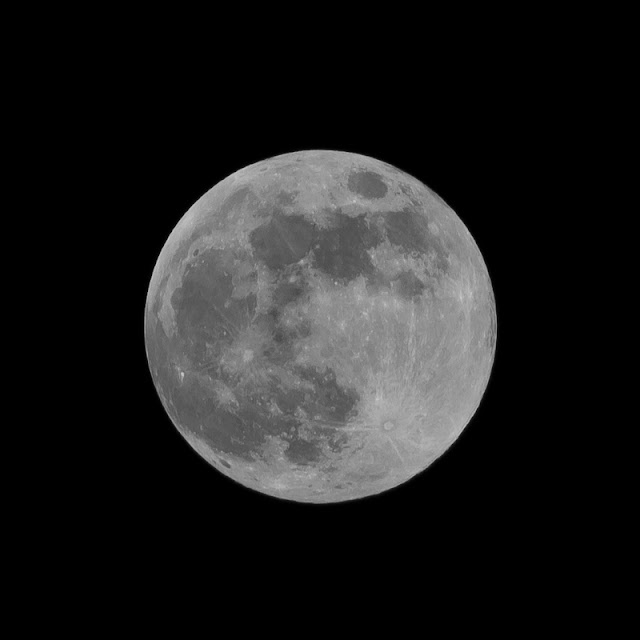
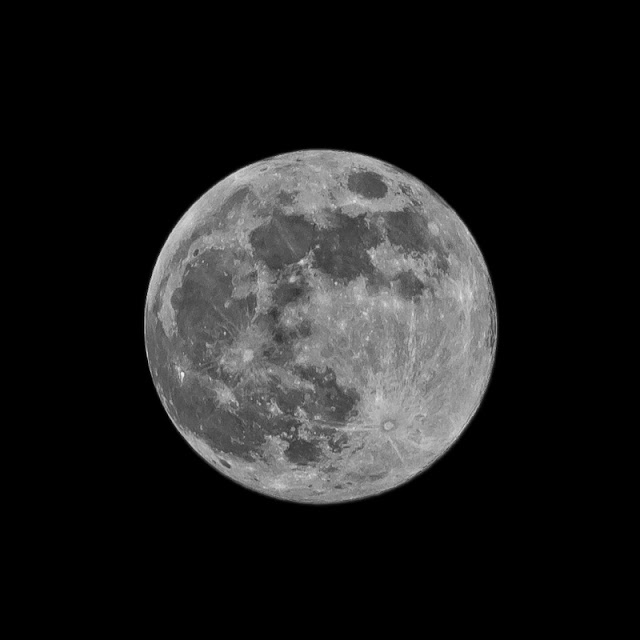
I also tried out tonal contrast on a full moon pic. The results are lackluster as you can see below. And the reason being that a a full moon is just like a subject lit with a camera's pop-up flash, while a crescent moon or quarter moon (as in above) is sidelighted. The former will look monotonously flat because of the lack of shadows.
Here's how I processed the raw image (it's one of those from the October 22 shoot).
- Open the image in Photoshop and flatten if necessary (the "invert" function is grayed out when the image opens as a smart object)
- Create a duplicate layer
- Change the blend mode to Vivid Light and set opacity to 50%
- Invert the image (CTRL-I in Windows)
- Apply Surface Blur using a radius of 40 and threshhold of 40
- Make a merged layer by pressing CTRL-SHIFT-ALT-E
- The moon image was already monochrome but if it weren't then I would have to desaturate by going to Edit > Adjustments > Desaturate
- Turn off or throw away the layer created in step #2
- Change blend mode of the merged layer to Overlay and set opacity to 75%
- Create a duplicate layer and change blend mode to Multiply and set opacity to 60%
- Create a mask in this new layer by clicking on the mask icon
- Use a brush size much larger than the moon (I used 900 px) with 50% hardness and 100% opacity
- Click on the mask to select it, choose black as foreground color, position the ginormous brush so that it covers the portion of the moon that's now underexposed (the portion closest to the transition between night and day on the moon), and click just once. This prevents Multiply from affecting that area. The 50% hardness creates a smooth masking transition
- Decrease brush size, increase brush hardness to 100%, change foreground color to white, and paint in all of the areas in the image that should be pitch black -- the portion of the moon unlit by the sun, which the 900px brush had masked out
In the Oct 22 shoot I had taken the images with the camera facing south and tilted upward--because that's how I was looking at the moon. Here I've rotated the pictures 90 degrees so this is how the moon would look if you were looking east and tilting your head waaaay back (and getting severe neck pain).
 |
| Canon EOS T3i, 1/10", f/11, ISO 100 EF 75-300mm @300mm No tonal contrast adjustment |
 |
| with tonal contrast adjustment |
I also tried out tonal contrast on a full moon pic. The results are lackluster as you can see below. And the reason being that a a full moon is just like a subject lit with a camera's pop-up flash, while a crescent moon or quarter moon (as in above) is sidelighted. The former will look monotonously flat because of the lack of shadows.
 |
| Canon EOS T3i, 1/100", f/11, ISO 100 EF 75-300mm @300mm No tonal contrast adjustment |
 |
| with tonal contrast adjustment, 50% Vivid Light and 100% Overlay |
Subscribe to:
Posts (Atom)


