 |
| Canon EOS T3i, 1/200", f/10, ISO 100 |
Sunday, September 29, 2013
HP 35s macro shot
Used the No. 2 macro extension tube on a 50mm. I had preset the aperture to f/10. Yongnuo 560-II flash is just a few inches off to the right the subject and about 2 inches above the calculator buttons. 1/64 power, no diffuser, RF trigger using a YN-603. Contrast boosted as much as possible in post.
Monday, April 22, 2013
Moon at its zenith
This is how the moon looked when I faced east and then tilted my head back. I applied an infrared filter (located in the channel mixer adjustment) during post processing (after applying the usual stuff in ACR). This ostensibly improved contrast and sharpness.
 |
| Canon T3i, 1/100", f/10, ISO 100, EF 75-300mm III @300mm |
Moon: sunny side up
It's shape tonight reminds me of a sunny side up. Taken at dusk but the dynamic range was just too great for the muted bluish sky to register.
 |
| Canon T3i, 1/100", f/10, ISO 100, EF 75-300mm III @300mm |
Wednesday, March 27, 2013
Full moon on a pretty clear night
 |
| Canon EOS T3i, 1/125", f/10, ISO 100, EF 75-300mm III @300mm |
Full moon, no clouds in sight, and excellent visibility across the city. So I couldn't pass up taking a series of shots from 1/60" to 1/250" in 1/3 stop decrements (all at f/10 and ISO 100).
After making the typical enhancements in ACR, the image was further edited in PS. I duplicated the image and applied a soft light blending mode at 100% opacity. This increased the contrast. Created a channel mixer layer and ticked the monochrome box and then chose the green filter. Added a curves adjustment layer and pulled down the darks while maintaining the highlights. This further bumped up the contrast.
Monday, March 18, 2013
Moon Jupiter Aldebaran triad
A star, a gaseous planet and a rocky satellite. Aldebaran is at the lower left of the frame.
Using the adjustment brush in ACR I decreased the exposure on the moon by 4 stops! and increased Jupiter and Aldebaran's by two stops.
Used the Channel Mixer adjustment on PS, turned it into monochrome and applied the infrared filter.
 |
| Canon EOS T3i, 1/4", f/10, ISO 100, EF 75-300mm III @150mm |
Using the adjustment brush in ACR I decreased the exposure on the moon by 4 stops! and increased Jupiter and Aldebaran's by two stops.
 |
| 1/40", f/10, ISO 100, EF 75-300mm III @300mm |
Sunday, March 17, 2013
Moon and Jupiter--fitting in a 100mm (APS-C) field of view
 |
| Canon EOS T3i, 1/8", f/10, ISO 100, EF 75-300mm III @100mm |
No comet, so I shot the moon
I searched for some half hour from early to late dusk, using a binocular to look for comet Pan-STARRS. Nada. It was a clear day--the first in many days--so I should've seen it. But it could be that it's now way low on the horizon and the buildings and trees were blocking it from view. Or maybe the air and light pollution in the city are just too much. Oh well.
For processing the shot of the waxing crescent I used luminosity masks and selected the Bright Lights and used multiply blending mode (100% opacity) to pull down the highlights. I then duplicated that layer again to further reduce the highlights. I duplicated it one more time but changed the blending mode to overlay (100% opacity) to bring up the contrast in the highlights. I hit CTRL+SHIFT+ALT+E to effectively create a flattened image without deleting the various layers. Opened a Channel Mixer adjustment layer, checked the monochrome box, and applied a green filter.
For processing the shot of the waxing crescent I used luminosity masks and selected the Bright Lights and used multiply blending mode (100% opacity) to pull down the highlights. I then duplicated that layer again to further reduce the highlights. I duplicated it one more time but changed the blending mode to overlay (100% opacity) to bring up the contrast in the highlights. I hit CTRL+SHIFT+ALT+E to effectively create a flattened image without deleting the various layers. Opened a Channel Mixer adjustment layer, checked the monochrome box, and applied a green filter.
 |
| Canon EOS T3i, 1/15", f/10, ISO 100, EF 75-300mm III @300mm, cropped |
Thursday, March 14, 2013
Moonset: waxing crescent
Just a couple of days after the new moon. I had just arrived home and quickly grabbed the cam. This was taken late dusk. Because the moon was close to the horizon there's so much more atmosphere and particulates between the cam and the moon, making image sharpness far from being the best (when the moon is at its zenith)
I saw a plane (big commercial airliner) buzzing by and so zoomed out and took a long exposure. Its landing lights were on when I saw it but then midway across the shot they turned them off. Pilots must've detected me shooting them and so quickly went into subdued mode :) If it still isn't obvious, the plane was moving from right to left.
Given how the correct exposure for the moon is less than half a sec, Luna in this shot is way, way overexposed. Of course, I could've taken two shots--a long exposure and a short one in order to get both the streaking airplane lights and a correctly exposed crescent and then combined them in PS. Well, I didn't. Too bad.
 |
| Canon EOS T3i, 1/8", f/10, ISO 100, EF 75-300mm III @300mm |
I saw a plane (big commercial airliner) buzzing by and so zoomed out and took a long exposure. Its landing lights were on when I saw it but then midway across the shot they turned them off. Pilots must've detected me shooting them and so quickly went into subdued mode :) If it still isn't obvious, the plane was moving from right to left.
Given how the correct exposure for the moon is less than half a sec, Luna in this shot is way, way overexposed. Of course, I could've taken two shots--a long exposure and a short one in order to get both the streaking airplane lights and a correctly exposed crescent and then combined them in PS. Well, I didn't. Too bad.
 |
| 10", f/10, ISO 100, EF 75-300mm III @75mm |
Monday, February 25, 2013
Bright red flower
 |
| Canon Powershot A480, 1/160", f/3, ISO 100, lens @6.6mm super macro mode |
Post processed the JPG image in Adobe Camera Raw. Added vignetting and adjusted hue, saturation and luminance of red, orange, yellow and green. And did the usual stuff--boosted clarity, contrast, sharpness. Cropped into a square format.

100% full moon
Awwooooo!

I initially took a series of bracketed shots at f/10. Heck, I thought I'd push the depth of field just to be sure of focus sharpness--lens' sweet spot be damned--and closed the aperture down to f/16. Canon T3i, 1/40", ISO 100, EF 75-300mm III @300mm. Autofocused using Live View at 10x magnification. Cable release to trip the shutter. Cam on a Benro A500FBH1 tripod. Used only Adobe Camera Raw post processing and nothing else. False color temperature--pushed it toward yellow and magenta.

I initially took a series of bracketed shots at f/10. Heck, I thought I'd push the depth of field just to be sure of focus sharpness--lens' sweet spot be damned--and closed the aperture down to f/16. Canon T3i, 1/40", ISO 100, EF 75-300mm III @300mm. Autofocused using Live View at 10x magnification. Cable release to trip the shutter. Cam on a Benro A500FBH1 tripod. Used only Adobe Camera Raw post processing and nothing else. False color temperature--pushed it toward yellow and magenta.
Monday, February 18, 2013
Jupiter and our moon
Was some 15 minutes from home in a parking lot when I happen to gaze up and saw the moon. I nearly yelled "Shit!" Jupiter was just a hairsbreadth away! Got home and grabbed the T3i, mounted the 75-300mm, plugged in the shutter release cable, switched over to manual mode and set the aperture to f/10, turned on auto bracketing with +/- 2 stops, and ran outside with my new Benro A500FBH1 tripod. Focusing was as always a hell of a chore. Used Live View and tried autofocus but it kept hunting so I took over.
Turns out bracketing wasn't necessary for the planned pseudo-HDR. Turns out HDR wasn't at all even necessary! My concern was Jupiter would be too faint when I had a good exposure of the moon and so given the various exposures I would take a frame with a correct exposure for each and then just mask out Jupiter/the moon on one of the layers. The image below is a single frame. According to the histogram there are no blown out highlights.
You won't fail to be bothered by the fact that the moon has a halo. That's because there was haze blanketing the sky. Just my luck. Arrgghh!!
If you want to read up here's an article about today's Earth's moon and Jupiter pairing
Turns out bracketing wasn't necessary for the planned pseudo-HDR. Turns out HDR wasn't at all even necessary! My concern was Jupiter would be too faint when I had a good exposure of the moon and so given the various exposures I would take a frame with a correct exposure for each and then just mask out Jupiter/the moon on one of the layers. The image below is a single frame. According to the histogram there are no blown out highlights.
You won't fail to be bothered by the fact that the moon has a halo. That's because there was haze blanketing the sky. Just my luck. Arrgghh!!
 |
| 1/10", f/10, ISO 100. Ha! All decimal values. Must be some lucky number series :) |
If you want to read up here's an article about today's Earth's moon and Jupiter pairing
Friday, February 15, 2013
SPLASH!

Well, not really. Just a macro shot of a boiled saba banana. Effect created by hand tearing the fruit instead of cutting with a utensil. Used the #2 extension tube and an EF-S 18-55mm II @55mm preset to f/16. Lit using a Yongnuo YN560-II set to 1/128 power, zoomed to 105mm, and positioned about 4 inches away from the subject. No diffuser was necessary at that distance and with such a small subject (diameter of around an inch). Triggering via Yongnuo R-603. Shutter: 1/160"
Sprouting a new crown
That tree that had shed its yellow leaves is now quickly getting a new crown of greenery. I saw the plane quite too late and quickly snapped a shot. I got lucky--it was flying parallel to the branches. But I wish I had that bird a little more to the left and out of the twigs. Unfortunately I wasn't expecting it and was completely caught off guard. I should've taken another shot right after but didn't, not least because I wasn't even sure what I had captured and wasn't aware how the plane was fortuitously pointing in the same direction as the branches.
By the way it's an Emirates. At first I thought it was Cathay.
By the way it's an Emirates. At first I thought it was Cathay.
 |
| Cano T3i, 1/160", f/10, ISO 100, EF-S 18-55mm II @55mm |
Monday, February 11, 2013
Terminalia catappa
Well, at least that's what I think is the name of this tree that's shedding its leaves by the ton. Soon it'll be barren and will be sprouting new greens.
It was a sunny day with just a hint of clouds. I wanted the hard light of the sun so that the leaves would "glow" as I shot from underneath.
Increased the saturation of the yellows, oranges and blues. And moved the hues a bit.
All images: Canon T3i, aperture priority, ISO 100, EF-S 18-55mm II @18mm.
Stopped the aperture down to f/16 to get a sunburst. The lens flare isn't too bad.
It was a sunny day with just a hint of clouds. I wanted the hard light of the sun so that the leaves would "glow" as I shot from underneath.
Increased the saturation of the yellows, oranges and blues. And moved the hues a bit.
All images: Canon T3i, aperture priority, ISO 100, EF-S 18-55mm II @18mm.
 |
| 1/100", f/11, noon |
Stopped the aperture down to f/16 to get a sunburst. The lens flare isn't too bad.
 |
| 1/60", f/16, 10AM |
 |
| 1/30", f/16, 10AM |
 |
| 1/160", f/8 |
Sunday, February 10, 2013
Playing with macro
Had all three of the extension tubes on the Canon T3i and then mounted an EF 75-300mm III that had been preset to f/16. Took bokeh shots and some "regular" ones. All images were heavily processed in post.
 |
| Leaves of a tree, 1/50", ISO 400 |
 |
| Pink bougainvillea flower and sky, 1/50", ISO 800 |
 |
| Tree with yellow leaves, 1/100", ISO 800 |
 |
| Ixora flower of 1/60", ISO 800 |
 |
| Grass, 1/100", ISO 800 |
 |
| Ixora flower, 1/50", ISO 800 |
Funeral or cannibalistic feast?
Just got a set of extension tubes. China made. Fully manual--no electrical contacts, not even for aperture. So to set a particular f-stop in Canon cams you first dial in the aperture and then while holding down the depth of field preview button remove the lens. That locks in the f-stop. After taking the lens off confirm that the aperture has in fact closed down by looking through the lens.
The set came with three tubes. For the shots below I mounted all three on the cam and used an EF 50mm f/1.8 II. Total extension length from body to lens is 2.5". No idea what the equivalent magnification would be. I chose an aperture to f/16 but even then the depth of field was frustratingly very shallow. And with the aperture closed down the view through the viewfinder was anything but bright. I was hand-holding the cam and focused by moving the camera forwards and back. Given that I had moving subjects I switched over to continuous shooting and sprayed away. Fortunately these couple of shots had decent sharpness.
I didn't use flash and relied on the fickle sun (yeah, it's actually the clouds' fault) for sufficient light. Both shots were taken at 1/100". I wanted to bump up the shutter speed but I was already at ISO 800 and noise was going to be a problem.


Shown below are the extension tubes and the adapter rings for the camera body (top left) and for the lens (top right).

The tubes and adapters all threaded together:

Tuesday, February 5, 2013
Chinese panorama
Saw this Chinese New Year decor at the center of the mall and wanted to take a pano. Only had my Canon Powershot A480 with me. Was at the topmost floor. View wasn't optimal. When I moved down to the third level I saw that I could lay the cam on the guard rail to steady it and get the full length of the streamers without tilting the cam up or down--that's best for a distortion-less pano. I had the cam in portrait orientation so as to maximize the top to bottom coverage. Shot at the the cam's widest angle. I positioned myself directly across the elevators to create a symmetric pano. I had the A480 on P mode and selected ISO 200 to get a decent shutter speed. Exposure was of course automatically selected by the cam. Fortunately it looks like the exposure on each frame is more or less the same. Took 10 shots with around 30 to 50% overlap to make life easier for Photoshop. Didn't bother enabling CHDK. Actually, for some reason when batteries are running low the cam shuts down when I try to switch on CHDK. No idea why.
And yes, I wish I could've moved that dang lantern obscuring the text on the streamer.
 |
Palette on a leaf
Took the leaf photo and created a color balance adjustment layer. Played with the cyan-red, magenta-green, and yellow-blue sliders for the shadows, midtones and highlights until I got a look I liked. I then added a curves adjustment layer to bring up brightness a tad without blowing the highlights.


Sunday, February 3, 2013
Landscape of a leaf
Lone leaf in the litter that carpeted the garden which isn't dessicated, brown and brittle. Love the deep red magenta color. I knew I wanted to get it sidelighted so as to bring out the textures, particularly the veins.
Gingerly washed the leaf and dried it. Placed a black felt paper on the floor. Laid the leaf on top. Placed a YN560 II about half a meter away and angled down about 30deg. Gobo-ed the top of the flash gun with a black cardboard to prevent light spill from getting into the camera lens. Set it to 1/64 power. Mounted an EF 50mm f/1.8 on the T3i. Shutter speed at 1 sec to let in a wee bit of ambient (had some warm CFLs on the ceiling). f/5.6 to get a decent depth of field (apparently insufficient since part of the image is soft!). ISO 100 to get least noise.
In post, I cropped and used luminosity masks and targeted contrast enhancements using soft light blend mode on the expanded midtones. Lightened the basic midtones with screen blend mode. Pulled down the brightness of the highlights via multiply.
I like both the horizontal and vertical versions.


Saturday, January 26, 2013
The typist
Single
black snooted flash on keyboard right (obviously!) with a large
aluminized baking tray (MacGyverism for the day) on the left to
reflect some of the burst of light and illuminate the otherwise pitch
black left side of the left hand. Converted to B&W in post and applied a red filter to brighten the fingers.
 |
| Canon T3i, EF-S 18-55mm @18mm, 1/100", f/10, ISO 200 |
Tuesday, January 22, 2013
Polaroid in the dark, blasted with hard restricted light
After taking the banal and easy route of shooting the Polaroid 250, I wanted to go the other direction and change the background from all white to all black. I'm able to describe using a white backdrop as easy as pie only because I had to literally shoot dozens of these "black shots" to get an image that's sufficiently ok--no, I'm hardly content with the results!
The Polaroid is still on the same table as before but of course I took out the white paper (a sheet off an old semi glossy calendar) and replaced it with a matte finished black cardboard.
I placed a piece of yellow cellophane over the flash head of a Yongnuo YN560 II and secured it with rubber band. I then fitted a snoot on it. Same thing with a second YN560 but using a blue cellophane.
The snoots are made from black cardboard, the same kind on which the Polaroid rests. One side of this board is glossy, the other matte. I used the matte side for the interior of the snoot to have a sharp light beam cut off. The yellow-gelled flash snoot measures 6 inches long (an inch or two is necessary to hold it snugly on the flash head). I made an 8-inch snoot for the blue-gelled flash. Both snoots are right cylinders (not conical).
The key light (yellow-gelled flash) is around 65cm (as measured from front of the flash head to the nearest point of the subject) away and angled down (the flash head and snoot, that is) around 20 degrees. The blue-gelled flash is some 55cm from the subject and not tilted at all (zero degrees)--the bottom of the snoot is practically at the same height as the table.
At first I had the lights much further from the subject. But then I was getting so much light spill and so I moved them closer thus making the background pitch black. This had the added advantage of permitting me to reduce the required flash power by a couple of stops.
A big problem I had was that the entire top surface of the rangefinder of the Polaroid was being underexposed no matter how I angled and raised the key light. So I took my Princeton-Tec EOS headlamp and held it a few inches above the rangefinder. I was shooting at 1/100" and knew I had to use a much slower speed to get enough of the LED light. Via trial and error I found that 1/4" was sufficient--any slower and I got unwanted light spill from the headlamp on other parts of the image. Fortuitously the color of the LED is bluish and so it doesn't stand out and instantly betray itself as a third light source.
I turned the above into B&W and bumped up the contrast. An advantage of using different (specially complementary) colors for each of the flash is that the brightness/exposure/luminosity levels of parts of the image can be independently manipulated in post just by simply going to the HSL panel, picking the color and adjusting its luminosity. I used this method to bring up the exposure a bit for the blue-lit part of the image.

You can't fail to notice the corrosion stains on the slot (labeled "4") from which the negative-print is pulled out. Ugly! Another peeve: that strip of shadow (about an inch below the shutter button) of the focusing "scissor" mechanism makes me go ballistic. Sure, I can get rid of it just by moving the light stand so that the light from the flash is close to perpendicular to the plane of the film (of the camera) but then a more frontal lighting doesn't cut it for me. I don't know about you but I don't like the the light quality on the following image.

The only other good thing about the above frontal lighting is that much more light has made it into the interior of the lens barrel thus bringing out much needed detail in that part of the subject, an important part I believe which I couldn't get with more oblique lighting.
The shot below uses the same softbox as in the previous shoot, and positioned practically the same. I actually took this shot before those above. Getting the background and the surface on which the subject rests jet black is, suffice to say, not going to happen here, unless the subject is raised well above the table (as in mounted on a tripod for instance) and far enough from the background. I had a white paper and cardboard reflector on camera left since I was trying to get some light to fall on the side of the bellows which as you can see is still way too underexposed.

The Polaroid is still on the same table as before but of course I took out the white paper (a sheet off an old semi glossy calendar) and replaced it with a matte finished black cardboard.
I placed a piece of yellow cellophane over the flash head of a Yongnuo YN560 II and secured it with rubber band. I then fitted a snoot on it. Same thing with a second YN560 but using a blue cellophane.
The snoots are made from black cardboard, the same kind on which the Polaroid rests. One side of this board is glossy, the other matte. I used the matte side for the interior of the snoot to have a sharp light beam cut off. The yellow-gelled flash snoot measures 6 inches long (an inch or two is necessary to hold it snugly on the flash head). I made an 8-inch snoot for the blue-gelled flash. Both snoots are right cylinders (not conical).
The key light (yellow-gelled flash) is around 65cm (as measured from front of the flash head to the nearest point of the subject) away and angled down (the flash head and snoot, that is) around 20 degrees. The blue-gelled flash is some 55cm from the subject and not tilted at all (zero degrees)--the bottom of the snoot is practically at the same height as the table.
At first I had the lights much further from the subject. But then I was getting so much light spill and so I moved them closer thus making the background pitch black. This had the added advantage of permitting me to reduce the required flash power by a couple of stops.
A big problem I had was that the entire top surface of the rangefinder of the Polaroid was being underexposed no matter how I angled and raised the key light. So I took my Princeton-Tec EOS headlamp and held it a few inches above the rangefinder. I was shooting at 1/100" and knew I had to use a much slower speed to get enough of the LED light. Via trial and error I found that 1/4" was sufficient--any slower and I got unwanted light spill from the headlamp on other parts of the image. Fortuitously the color of the LED is bluish and so it doesn't stand out and instantly betray itself as a third light source.
 |
| Canon T3i, manual mode, 1/4", f/16, ISO 200, EF 75-300mm III @105mm, manual focusing, yellow-gelled YN560 II flash @1/16 power, blue-gelled YN560 II flash @1/64 power |
I turned the above into B&W and bumped up the contrast. An advantage of using different (specially complementary) colors for each of the flash is that the brightness/exposure/luminosity levels of parts of the image can be independently manipulated in post just by simply going to the HSL panel, picking the color and adjusting its luminosity. I used this method to bring up the exposure a bit for the blue-lit part of the image.

You can't fail to notice the corrosion stains on the slot (labeled "4") from which the negative-print is pulled out. Ugly! Another peeve: that strip of shadow (about an inch below the shutter button) of the focusing "scissor" mechanism makes me go ballistic. Sure, I can get rid of it just by moving the light stand so that the light from the flash is close to perpendicular to the plane of the film (of the camera) but then a more frontal lighting doesn't cut it for me. I don't know about you but I don't like the the light quality on the following image.

The only other good thing about the above frontal lighting is that much more light has made it into the interior of the lens barrel thus bringing out much needed detail in that part of the subject, an important part I believe which I couldn't get with more oblique lighting.
The shot below uses the same softbox as in the previous shoot, and positioned practically the same. I actually took this shot before those above. Getting the background and the surface on which the subject rests jet black is, suffice to say, not going to happen here, unless the subject is raised well above the table (as in mounted on a tripod for instance) and far enough from the background. I had a white paper and cardboard reflector on camera left since I was trying to get some light to fall on the side of the bellows which as you can see is still way too underexposed.

Saturday, January 19, 2013
Polaroid 250 Land Camera
Dad's Polaroid 250 Land camera. There's still a couple of ASA 75 color film packs, sealed and in their original boxes. The use-before date on the cartons is 1968 while Polaroid made this camera starting 1967 with the instruction manual having a printing date of 1968. Ergo, dad must've bought this cam in 1968. This here unit is some 45 years old! Though not in mint condition I bet it'll still work.
Film pack is placed at the back of the camera. After taking a shot you pull a paper tab that sticks out on one side. As the negative and the print are dragged out, rollers in the camera squeeze and spread the developer between them. After giving it a minute or so of development time the negative is peeled off leaving the positive print--the photo.
This model sports a Zeiss-Ikon rangefinder. Excellent focusing system! In the viewfinder you get two ghost images of the subject. You manipulate the focus lever until the two images are exactly on top of one another.
More info on this model: http://camerapedia.wikia.com/wiki/Polaroid_Land_Model_250
Setup for this photoshoot: Canon Rebel T3i in manual mode, 1/100", f/16, ISO 200, manual focus using Live View and x10 digital zoom. Lens: EF 75-300mm III at 105 to 135mm. Lighting consisted of a single Yongnuo YN560 II flash set to 1/4 power and an 80 x 80cm softbox positioned approximately at the Rembrandt angle some half meter from the subject. A pair of Yongnuo RF-603 were used as flash trigger.
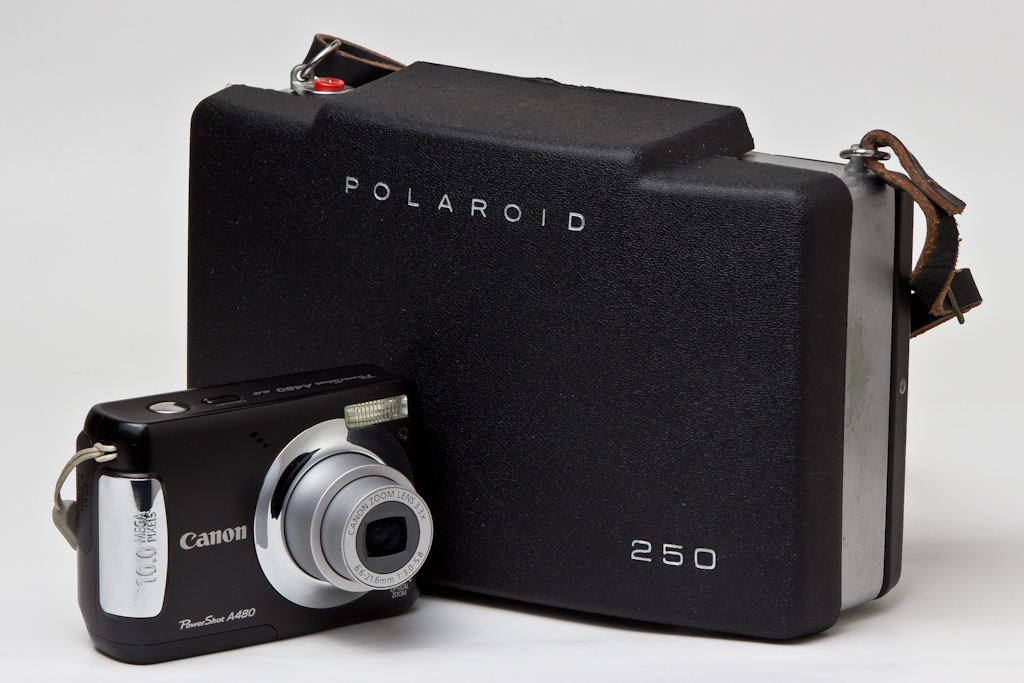 |
| To provide some scale here's a Canon Powershot A480 beside the Polaroid 250. The 250 is BIG! Bigger than an SLR, specially when fully extended. To use the camera that black plastic cover is first removed |
 |
| With protective plastic cover removed |
 |
| Rangefinder flipped up. A magnet holds it in place. |
 |
| Bellows fully extended and locked in place. Camera is ready to take pictures. Well, if you have a film pack and the special battery installed, that is. |
 |
| The ASA dial is below the letter A in "Polaroid" beneath the lens. The yellow on black thingie below the letter O is an aperture adjustment (there are only two settings). The lever with a white knob arms the shutter and has to be cocked before every shot. The red button beside the rangefinder is of course the shutter release. |
 |
| You didn't expect an LCD screen on the back, did you? |
 |
| Back of the camera open. That's where the film pack goes. I've only cleaned the exterior of the cam. Will have to use a blower and adhesive tape to try and get rid of all those flecks and dust inside. |
Subscribe to:
Posts (Atom)