 |
| Canon T3i, EF-S 18-55mm @18mm, 1/100", f/10, ISO 200 |
Saturday, January 26, 2013
The typist
Single
black snooted flash on keyboard right (obviously!) with a large
aluminized baking tray (MacGyverism for the day) on the left to
reflect some of the burst of light and illuminate the otherwise pitch
black left side of the left hand. Converted to B&W in post and applied a red filter to brighten the fingers.
Tuesday, January 22, 2013
Polaroid in the dark, blasted with hard restricted light
After taking the banal and easy route of shooting the Polaroid 250, I wanted to go the other direction and change the background from all white to all black. I'm able to describe using a white backdrop as easy as pie only because I had to literally shoot dozens of these "black shots" to get an image that's sufficiently ok--no, I'm hardly content with the results!
The Polaroid is still on the same table as before but of course I took out the white paper (a sheet off an old semi glossy calendar) and replaced it with a matte finished black cardboard.
I placed a piece of yellow cellophane over the flash head of a Yongnuo YN560 II and secured it with rubber band. I then fitted a snoot on it. Same thing with a second YN560 but using a blue cellophane.
The snoots are made from black cardboard, the same kind on which the Polaroid rests. One side of this board is glossy, the other matte. I used the matte side for the interior of the snoot to have a sharp light beam cut off. The yellow-gelled flash snoot measures 6 inches long (an inch or two is necessary to hold it snugly on the flash head). I made an 8-inch snoot for the blue-gelled flash. Both snoots are right cylinders (not conical).
The key light (yellow-gelled flash) is around 65cm (as measured from front of the flash head to the nearest point of the subject) away and angled down (the flash head and snoot, that is) around 20 degrees. The blue-gelled flash is some 55cm from the subject and not tilted at all (zero degrees)--the bottom of the snoot is practically at the same height as the table.
At first I had the lights much further from the subject. But then I was getting so much light spill and so I moved them closer thus making the background pitch black. This had the added advantage of permitting me to reduce the required flash power by a couple of stops.
A big problem I had was that the entire top surface of the rangefinder of the Polaroid was being underexposed no matter how I angled and raised the key light. So I took my Princeton-Tec EOS headlamp and held it a few inches above the rangefinder. I was shooting at 1/100" and knew I had to use a much slower speed to get enough of the LED light. Via trial and error I found that 1/4" was sufficient--any slower and I got unwanted light spill from the headlamp on other parts of the image. Fortuitously the color of the LED is bluish and so it doesn't stand out and instantly betray itself as a third light source.
I turned the above into B&W and bumped up the contrast. An advantage of using different (specially complementary) colors for each of the flash is that the brightness/exposure/luminosity levels of parts of the image can be independently manipulated in post just by simply going to the HSL panel, picking the color and adjusting its luminosity. I used this method to bring up the exposure a bit for the blue-lit part of the image.

You can't fail to notice the corrosion stains on the slot (labeled "4") from which the negative-print is pulled out. Ugly! Another peeve: that strip of shadow (about an inch below the shutter button) of the focusing "scissor" mechanism makes me go ballistic. Sure, I can get rid of it just by moving the light stand so that the light from the flash is close to perpendicular to the plane of the film (of the camera) but then a more frontal lighting doesn't cut it for me. I don't know about you but I don't like the the light quality on the following image.

The only other good thing about the above frontal lighting is that much more light has made it into the interior of the lens barrel thus bringing out much needed detail in that part of the subject, an important part I believe which I couldn't get with more oblique lighting.
The shot below uses the same softbox as in the previous shoot, and positioned practically the same. I actually took this shot before those above. Getting the background and the surface on which the subject rests jet black is, suffice to say, not going to happen here, unless the subject is raised well above the table (as in mounted on a tripod for instance) and far enough from the background. I had a white paper and cardboard reflector on camera left since I was trying to get some light to fall on the side of the bellows which as you can see is still way too underexposed.

The Polaroid is still on the same table as before but of course I took out the white paper (a sheet off an old semi glossy calendar) and replaced it with a matte finished black cardboard.
I placed a piece of yellow cellophane over the flash head of a Yongnuo YN560 II and secured it with rubber band. I then fitted a snoot on it. Same thing with a second YN560 but using a blue cellophane.
The snoots are made from black cardboard, the same kind on which the Polaroid rests. One side of this board is glossy, the other matte. I used the matte side for the interior of the snoot to have a sharp light beam cut off. The yellow-gelled flash snoot measures 6 inches long (an inch or two is necessary to hold it snugly on the flash head). I made an 8-inch snoot for the blue-gelled flash. Both snoots are right cylinders (not conical).
The key light (yellow-gelled flash) is around 65cm (as measured from front of the flash head to the nearest point of the subject) away and angled down (the flash head and snoot, that is) around 20 degrees. The blue-gelled flash is some 55cm from the subject and not tilted at all (zero degrees)--the bottom of the snoot is practically at the same height as the table.
At first I had the lights much further from the subject. But then I was getting so much light spill and so I moved them closer thus making the background pitch black. This had the added advantage of permitting me to reduce the required flash power by a couple of stops.
A big problem I had was that the entire top surface of the rangefinder of the Polaroid was being underexposed no matter how I angled and raised the key light. So I took my Princeton-Tec EOS headlamp and held it a few inches above the rangefinder. I was shooting at 1/100" and knew I had to use a much slower speed to get enough of the LED light. Via trial and error I found that 1/4" was sufficient--any slower and I got unwanted light spill from the headlamp on other parts of the image. Fortuitously the color of the LED is bluish and so it doesn't stand out and instantly betray itself as a third light source.
 |
| Canon T3i, manual mode, 1/4", f/16, ISO 200, EF 75-300mm III @105mm, manual focusing, yellow-gelled YN560 II flash @1/16 power, blue-gelled YN560 II flash @1/64 power |
I turned the above into B&W and bumped up the contrast. An advantage of using different (specially complementary) colors for each of the flash is that the brightness/exposure/luminosity levels of parts of the image can be independently manipulated in post just by simply going to the HSL panel, picking the color and adjusting its luminosity. I used this method to bring up the exposure a bit for the blue-lit part of the image.

You can't fail to notice the corrosion stains on the slot (labeled "4") from which the negative-print is pulled out. Ugly! Another peeve: that strip of shadow (about an inch below the shutter button) of the focusing "scissor" mechanism makes me go ballistic. Sure, I can get rid of it just by moving the light stand so that the light from the flash is close to perpendicular to the plane of the film (of the camera) but then a more frontal lighting doesn't cut it for me. I don't know about you but I don't like the the light quality on the following image.

The only other good thing about the above frontal lighting is that much more light has made it into the interior of the lens barrel thus bringing out much needed detail in that part of the subject, an important part I believe which I couldn't get with more oblique lighting.
The shot below uses the same softbox as in the previous shoot, and positioned practically the same. I actually took this shot before those above. Getting the background and the surface on which the subject rests jet black is, suffice to say, not going to happen here, unless the subject is raised well above the table (as in mounted on a tripod for instance) and far enough from the background. I had a white paper and cardboard reflector on camera left since I was trying to get some light to fall on the side of the bellows which as you can see is still way too underexposed.

Saturday, January 19, 2013
Polaroid 250 Land Camera
Dad's Polaroid 250 Land camera. There's still a couple of ASA 75 color film packs, sealed and in their original boxes. The use-before date on the cartons is 1968 while Polaroid made this camera starting 1967 with the instruction manual having a printing date of 1968. Ergo, dad must've bought this cam in 1968. This here unit is some 45 years old! Though not in mint condition I bet it'll still work.
Film pack is placed at the back of the camera. After taking a shot you pull a paper tab that sticks out on one side. As the negative and the print are dragged out, rollers in the camera squeeze and spread the developer between them. After giving it a minute or so of development time the negative is peeled off leaving the positive print--the photo.
This model sports a Zeiss-Ikon rangefinder. Excellent focusing system! In the viewfinder you get two ghost images of the subject. You manipulate the focus lever until the two images are exactly on top of one another.
More info on this model: http://camerapedia.wikia.com/wiki/Polaroid_Land_Model_250
Setup for this photoshoot: Canon Rebel T3i in manual mode, 1/100", f/16, ISO 200, manual focus using Live View and x10 digital zoom. Lens: EF 75-300mm III at 105 to 135mm. Lighting consisted of a single Yongnuo YN560 II flash set to 1/4 power and an 80 x 80cm softbox positioned approximately at the Rembrandt angle some half meter from the subject. A pair of Yongnuo RF-603 were used as flash trigger.
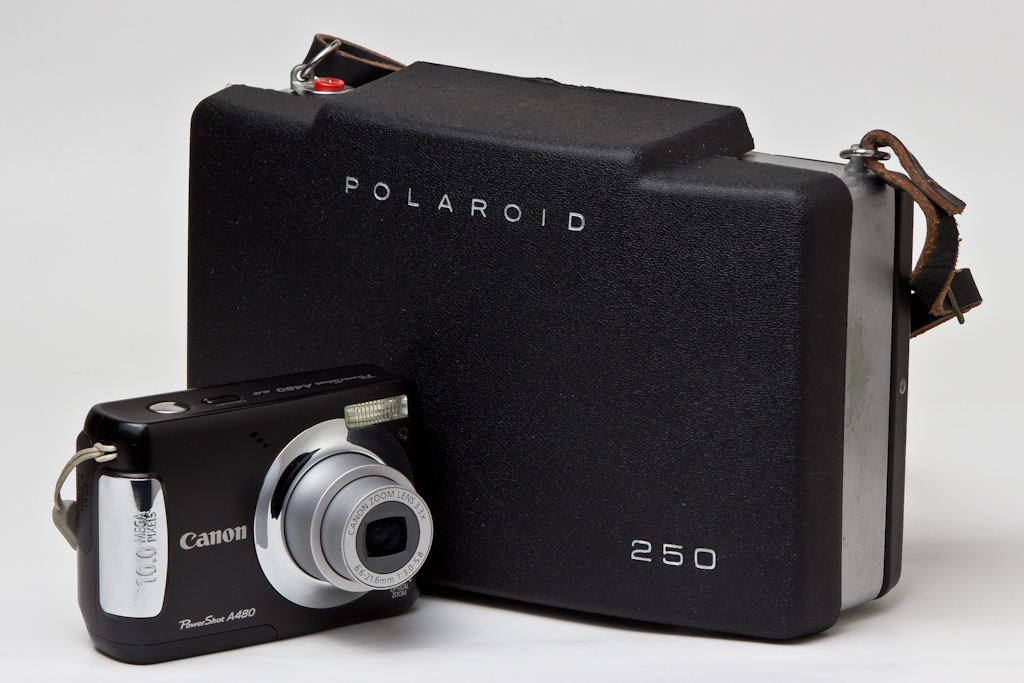 |
| To provide some scale here's a Canon Powershot A480 beside the Polaroid 250. The 250 is BIG! Bigger than an SLR, specially when fully extended. To use the camera that black plastic cover is first removed |
 |
| With protective plastic cover removed |
 |
| Rangefinder flipped up. A magnet holds it in place. |
 |
| Bellows fully extended and locked in place. Camera is ready to take pictures. Well, if you have a film pack and the special battery installed, that is. |
 |
| The ASA dial is below the letter A in "Polaroid" beneath the lens. The yellow on black thingie below the letter O is an aperture adjustment (there are only two settings). The lever with a white knob arms the shutter and has to be cocked before every shot. The red button beside the rangefinder is of course the shutter release. |
 |
| You didn't expect an LCD screen on the back, did you? |
 |
| Back of the camera open. That's where the film pack goes. I've only cleaned the exterior of the cam. Will have to use a blower and adhesive tape to try and get rid of all those flecks and dust inside. |
Subscribe to:
Posts (Atom)